Going Live
Here are the steps you need to follow when your site is ready to go live.
1 - Domains
First step is to add your domain.
You can add multiple domains to point to your project. Each domain can have its own SSL certificate.
After you have added your domain, your Master environment will no longer
be accessible at master-<project_id>.<cluster>.platform.sh.
If you require access to the site, you can create a hosts file entry and point it to the IP address that resolves when you access your master project branch.
note If you are on a Development plan, you cannot add a domain. You would need to upgrade your subscription to a production plan.
2 - Routes
You can configure the routes of your project directly within the
Web Interface or within your .platform/routes.yaml file.
Single hostname
If you want your site to only be available at http://mydomain.com and
have http://www.mydomain.com redirect to http://mydomain.com, you
need define your routes.yaml as follow:
"http://{default}/":
    type: upstream
    upstream: "php:php"

"http://www.{default}/":
    type: redirect
    to: "http://{default}/"
Multiple hostnames
If you want your site to be available at both http://mydomain.com and
http://www.mydomain.com, you need to define one upstream for each
hostname.
Here would be an example of your routes.yaml for the
http://mydomain.com URL:
"http://{default}/":
    type: upstream
    upstream: "php:php"

"http://www.{default}/":
    type: upstream
    upstream: "php:php"
note You can test those routes on your development environments with:
http://[branch]-[project-id].[region].platform.shhttp://www-[branch]-[project-id].[region].platform.sh
HTTPS
If you have uploaded your SSL certificate and you want to serve your entire site with HTTPS, here is what your routes would look like:
"https://{default}/":
    type: upstream
    upstream: "php:php"

"http://{default}/":
    type: redirect
    to: "https://{default}/"
Wildcard domains
To configure a wildcard domain (*.mydomain.com):
- Add your domain to your project (in form of mydomain.com).
- Add a route to your master branch serving http://*.mydomain.com with the upstream php:php.
3 - DNS
Configure your DNS provider to point your domain to your Platform.sh Master environment.
Once you've checked with your registrar about where to change your DNS
settings, add a CNAME record that references the Master environment's
hostname: <environment>-<project>.<region>.platform.sh
If you use multiple hostnames for your site, you need to add a CNAME
record for each of them. For example:
master-k4ywtmwigmmgc.eu.platform.sh and
www-master-k4ywtmwigmmgc.eu.platform.sh.
Note: This will not work for an apex (or "naked") domain. In that
case, you need to use a DNS provider that supports forwarding DNS
queries (such as the CNAME with ALIAS record from
Dyn, or the ANAME
record on DNS Made
Easy). Many other
providers also offer work arounds to accomplish this goal. The most common is
to add a CNAME record for the www host on the domain and then use the
DNS provider's redirection service to redirect the apex over to the
www version of the domain. Check with your DNS provider to see how
they support this.
Naked domain (without www)
The www portion of your domain is a subdomain. In fact, any part of your domain that precedes domain.tld can be called a subdomain, not just “obvious” subdomains like shop.domain.tld.
One of the challenges of using a cloud hosting service like Amazon Web Services (AWS) Elastic Cloud (EC2) is that you need to point your DNS to a CNAME. The problem is the DNS RFC (RFC1033) requires the "zone apex" (sometimes called the "root domain" or "naked domain") to be an "A Record," not a CNAME. This means that with most DNS providers you can setup a subdomain CNAME to point to EC2, but you cannot setup your root domain as a CNAME to point to EC2.
In other words, with most DNS providers:
you can do this www.domain.tld CNAME <environment>-<project>.<region>.platform.sh
you can't do this domain.tld CNAME <environment>-<project>.<region>.platform.sh
You also cannot reliably point your root A Record to an IP address within the cloud providers network since they reserve the right to reallocate the IP address dedicated to your instance.
Some DNS hosts provide a way to get CNAME-like functionality at the zone apex using a custom record type. Such records include:
- CNAME at Namecheap
- ALIAS at DNSimple
- ANAME at DNS Made Easy
- ANAME at easyDNS
- ACNAME at CloudFlare
- ALIAS at PointDNS
These ALIAS/CNAME/ANAME records resolves on request the IP address of the destination record and serves it as if it would be the IP address for the apex domain requested. If the IP address for the destination changes, the IP address for the mapped domain changes automatically as well.
4 - SSL/TLS
- Generate private key
- Use openssl to generate a new private key
- Generate CSR
- Submit CSR to SSL provider
- Subdomain
- Root domain
- Testing SSL
- Add / change certificate
General SSL Information
Staging, and other development environments can use a wildcard certificate provided by Platform.sh.
Purchasing an SSL cert varies in cost and process depending on the vendor. Using SSL providers will require some or all of the following steps:
Generate private key Before requesting an SSL cert, you need to generate a private key in your local environment using the openssl tool. If you aren’t able to execute the openssl command from the terminal you may need to install it.
Mac OS X
Your OS X installation should come with OpenSSL installed, but
you might consider installing a more recent version using homebrew:
brew install openssl
Windows
Ubuntu Linux
apt-get install openssl
Use openssl to generate a new private key
When prompted, enter an easy password value as it will only be used when generating the CSR and not by your app at runtime.
openssl genrsa -des3 -out server.pass.key 2048 ...
Enter pass phrase for server.pass.key:
Verifying -
Enter pass phrase for server.pass.key:
The private key needs to be stripped of its password so it can be loaded without manually entering the password.
$ openssl rsa -in server.pass.key -out server.key
You now have a server.key private key file in your current working directory.
Generate CSR
A CSR is a certificate signing request and is also required when purchasing an SSL cert. Using the private key from the previous step, generate the CSR. This will require you to enter identifying information about your organization and domain.
Though most fields are self-explanatory, pay close attention to the following:
Country Name The two letter code, in ISO 3166-1 format, of the country in which your organization is based.
Common Name This is the fully qualified domain name that you wish to secure. For a single subdomain: www.example.com For all subdomains, specify the wildcard URL: *.example.com For the root domain: example.com
The Common Name field must match the secure domain. You cannot purchase a certificate for the root domain, e.g.,example.com, and expect to secure www.example.com. The inverse is also true. Each domain can have one certificate and it can be attached to the main domain or subdomain.
Generate the CSR:
$ openssl req -nodes -new -key server.key -out server.csr
...
Country Name (2 letter code) [AU]:US
Common Name (eg, YOUR name) []:www.example.com
...
The result of this operation will be a server.csr file in your local directory (alongside the server.key private key file from the previous step).
Submit CSR to SSL provider
Next, begin the process of creating a new SSL certificate with your chosen certificate provider. This will vary depending on your provider, but at some point you will need to upload the CSR generated in the previous step.
You may also be asked for what web server to create the certificate. If so, select Nginx as the web server for use on Platform.sh. If Nginx is not an option, Apache 2.x will also suffice.
If you’re given an option of what certificate format to use (PKCS, X.509 etc…) choose X.509.
If you want to secure more than one subdomain you will need to purchase a wildcard certificate from your provider. While these certificates are typically more expensive, they allow you to serve requests for all subdomains of *.example.com over SSL.
On completion of the SSL certificate purchase process you should have several files including:
- The SSL certificate for the domain specified in your CSR, downloaded from your certificate provider. This file will have either a .pem or .crt extension.
- The private key you generated in the first step, server.key.
Once you have the SSL certificate file and private key you are ready to configure SSL for your project.
Use the Platform.sh Web Interface to add the certificate
You can also add your certificate via the Platform.sh Web Interface. Just go to the project configuration page in the web interface and click on Domains. If you already have a domain, you can edit the domain and then click on the Add SSL certificate button. You can then add your private key, public key certificate and optional certificate chain.
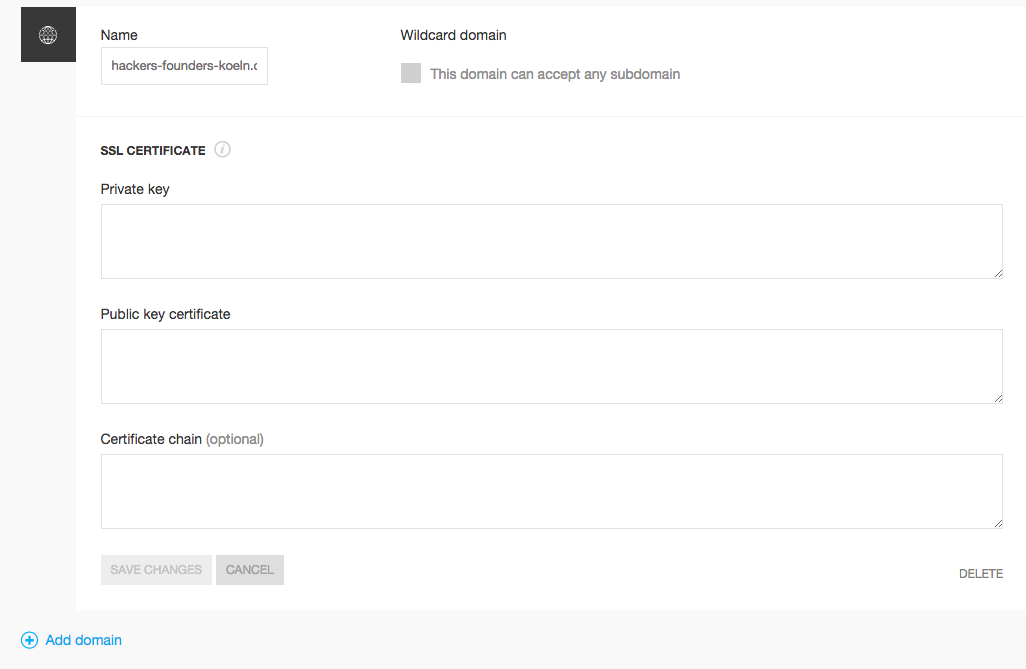
note Private key should be in the old style, which means it should begin with BEGIN RSA PRIVATE KEY. If it starts with BEGIN PRIVATE KEY that means it is bundled with the identifier for key type. To convert it to the old style RSA key: openssl rsa -in private.key -out private.rsa.key
Use the Platform.sh CLI to add the certificate
Example:
platform domain:add secure.example.com --cert=/etc/ssl/private/secure-example-com.crt --key=/etc/ssl/private/secure-example-com.key
Type platform help domain:add for more information.
Subdomain
If you’re securing a subdomain, e.g., www.example.com, modify your DNS settings and create a CNAME record to the endpoint or modify the CNAME target if you already have a CNAME record.
Record Name Target
CNAME www ENVIRONMENT-PROJECT-ID.REGION.platform.sh.
If you’re using a wildcard certificate your DNS setup will look similar.
Record Name Target
CNAME * ENVIRONMENT-PROJECT-ID.REGION.platform.sh.
Root domain
If you’re securing a root domain, e.g., example.com, you must be using a DNS provider that provides CNAME-like functionality at the zone apex.
Modify your DNS settings and create an ALIAS or ANAME record to the endpoint.
Record Name Target
ALIAS or ANAME empty or @
ENVIRONMENT-PROJECT-ID.REGION.platform.sh
In case you want to change an already added certificate, you will have to remove the domain and add it again with the new certificate.
Testing SSL
Use a command line utility like curl to test that everything is configured correctly for your secure domain.
The -k option tells curl to ignore untrusted certificates.
$ curl -kvI https://www.example.com
About to connect() to www.example.com port 443 (#0)
Trying 50.16.234.21... connected
Connected to www.example.com (50.16.234.21) port 443 (#0)
SSLv3, TLS handshake, Client hello (1):
SSLv3, TLS handshake, Server hello (2):
SSLv3, TLS handshake, CERT (11):
SSLv3, TLS handshake, Server finished (14):
SSLv3, TLS handshake, Client key exchange (16):
SSLv3, TLS change cipher, Client hello (1):
SSLv3, TLS handshake, Finished (20):
SSLv3, TLS change cipher, Client hello (1):
SSLv3, TLS handshake, Finished (20):
SSL connection using AES256-SHA
Server certificate:
subject: C=US; ST=CA; L=SF; O=SFDC; OU=Heroku; CN=www.example.com
start date: 2011-11-01 17:18:11 GMT
expire date: 2012-10-31 17:18:11 GMT
common name: www.example.com (matched)
issuer: C=US; ST=CA; L=SF; O=SFDC; OU=Heroku; CN=www.heroku.com
SSL certificate verify ok.
> GET / HTTP/1.1
> User-Agent: curl/7.19.7 (universal-apple-darwin10.0) libcurl/7.19.7 OpenSSL/0.9.8r zlib/1.2.3
> Host: www.example.com
> Accept: */*
Pay attention to the output. It should print SSL certificate verify ok. If it prints something like common name: www.example.com (does not match 'www.somedomain.com') then something is not configured correctly.
note Platform.sh supports all kinds of certificates including domain-validated certificates, extended validation (EV) certificates, high-assurance certificates and wildcard certificates.